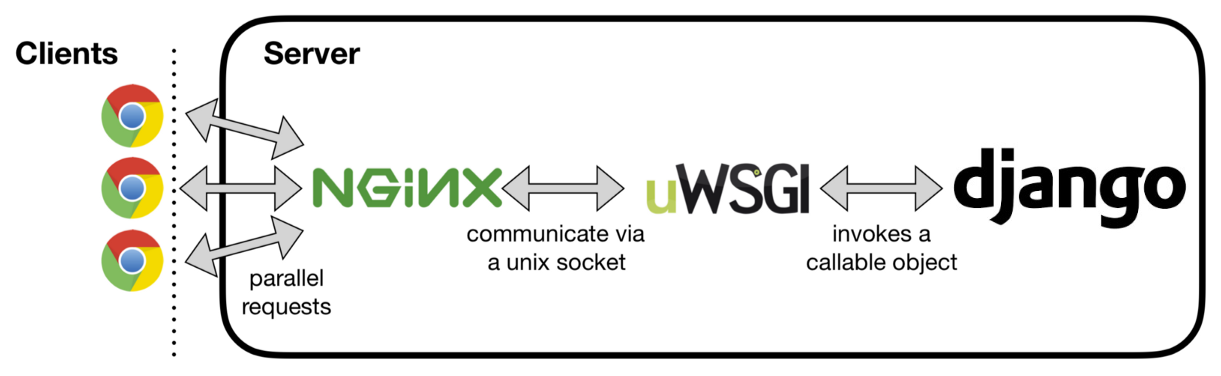
In this project we’ll be hosting a django app on a Linux machine (we’ll consider Ubuntu) using Nginx and uWSGI. Nginx is commonly used as a webserver to serve static assets such as images, CSS and JavaScript to web browser clients. Nginx is also typically configured as a reverse proxy, which passes appropriate incoming HTTP requests to a WSGI server. The WSGI server produces dynamic content by running Python code. When the WSGI server passes its response, which is often in the HTML, JSON, or XML format, the reverse proxy then responds to the client with that result.
Assumptions
For this post, we’ll assume the following things
- We have a fresh Ubuntu machine as well as a django app ready to deploy.
- The username of the user in the ubuntu instance is djuser and it has sudo privileges.
- The django app (directory containing the manage.py file) is located in the path
/deploy/portal/. -
The django app has the following directory structure
portal
   ├── dj
   |   ├── __init__.py
   |   ├── settings.py
   |   ├── urls.py
   |   ├── views.py
   |   ├── wsgi.py
   ├── static_files
   |   ├── ...
   |   └── ...
   ├── media_files
   |   ├── ...
   |   └── ...
   ├── manage.py
   ├── ...
   └── ...
For the rest of the post, replace these assumed values with your own.
Installing and Setting Up Dependencies
-
Update the ubuntu instance
$ sudo apt-get update $ sudo apt-get upgrade -
Build and install dependencies
$ sudo apt install build-essential checkinstall $ sudo apt install libreadline-gplv2-dev libncursesw5-dev libssl-dev libsqlite3-dev tk-dev libgdbm-dev libc6-dev libbz2-dev libffi-dev -
Create a virtual environment and activate it. We’ll create the virtual environment in the path
/deploy/venv$ python3 -m venv /deploy/venv $ source /deploy/venv/bin/activate -
Install uWSGI along with its dependencies
$ sudo apt-get install python3-dev $ pip install uwsgi -
Install nginx
$ sudo apt-get install nginx -
Install django and other requirements depending on your specifications
$ pip install Django $ pip install -r requirements.txt # Run this if you have other 3rd party libraries that need to be installed -
Update the
ALLOWED_HOSTSin settings.py to include the system’s public IP address or a domain name (if you have any).
Setting up the uWSGI Application Server
After installing and setting up the depencies, we are ready to configure uWSGI to serve our app to the web. Let’s test-run the server with uWSGI. The command below does the same thing as manage.py runserver.
$ uwsgi --http :8000 --home /deploy/venv --chdir /deploy/portal -w dj.wsgi
Creating uWSGI configuration file
Running uWSGI from the command line is only useful for testing. For actual deployment, we will create a .ini file as it will help us in specifying configuration for handling heavy loads.
-
First, we need to create a log file and a run directory where the socket file will be created. We’ll create them in the
/deploydirectory. We also need to ensure the permissions for these directories so that every group or user can write or execute files in these directories.$ cd /deploy $ mkdir log $ touch log/uwsgi.log $ sudo chmod 777 log $ mkdir run $ sudo chmod 777 run -
Now, create a directory in your system where you’ll store the configuration file. In this post, we create a directory with the name conf and inside that directory will be our config file with the name uwsgi.ini
$ mkdir conf $ cd conf $ touch uwsgi.ini -
Open the uwsgi.ini file and paste the code from below into it
[uwsgi]

# the user and the group which will execute the file
uid = djuser
gid = www-data

# name of the the folder containing the settings.py file
project_name = dj

# path to the directory where the project is present
base_dir = /deploy

# path to the virtual environment
virtualenv = %(base_dir)/venv

# path to the directory containing the manage.py file
chdir = %(base_dir)/portal

# loading the wsgi module
module = %(project_name).wsgi:application

# enabling master process with n numer of child process
master = true
processes = 4

# Enable post buffering past N bytes. save to disk all HTTP bodies larger than the limit
post-buffering = 204800

# Serialize accept() usage (if possibie)
thunder-lock = True

# Bind to the specified socket using default uwsgi protocol and set permissions to it
uwsgi-socket = %(base_dir)/run/uwsgi.sock
chmod-socket = 666

# Set internal sockets timeout in seconds
socket-timeout = 300

# Set the maximum time (in seconds) a worker can take to reload/shutdown
reload-mercy = 8

# Reload a worker if its address space usage is higher than the specified value (in megabytes)
reload-on-as = 512

# respawn processes taking more than 50 seconds
harakiri = 50

# respawn processes after serving 5000 requests
max-requests = 5000

# clear environment on exit
vacuum = true

# When enabled (set to True), only uWSGI internal messages and errors are logged
disable-logging = True

# path to where uwsgi logs will be saved
logto = %(base_dir)/log/uwsgi.log

# maximum size of log file 20MB
log-maxsize = 20971520

# Set logfile name after rotation
log-backupname = %(base_dir)/log/old-uwsgi.log

# Reload uWSGI if the specified file or directory is modified/touched
touch-reload = %(base_dir)/portal

# Reload workers after this many seconds. Disabled by default
max-worker-lifetime = 300
After the configuration file is created, let’s try running the server
$ uwsgi --ini /deploy/conf/uwsgi.ini
If you didn’t see any errors then it means that uwsgi has been setup successfully. To check the logs, open the file /deploy/log/uwsgi.log.
Setting up uWSGI as a systemd service
Right now, everytime we want to host our website, we have to keep the uwsgi command running. This is not an ideal solution. In order to make sure that uWSGI keeps on running in the background without us having to manually run a command, we’ll set it up as a systemd service.
-
Create and open a systemd service file for uWSGI
sudo nano /etc/systemd/system/uwsgi.service -
Copy and paste the code below into that file
[Unit] Description=uWSGI instance to serve portal After=network.target [Service] User=djuser Group=www-data WorkingDirectory=/deploy/portal Environment="PATH=/deploy/venv/bin" ExecStart=/deploy/venv/bin/uwsgi --ini /deploy/conf/uwsgi.ini [Install] WantedBy=multi-user.target -
Reload systemctl daemon to reload systemd manager configuration
$ sudo systemctl daemon-reload -
Enable uwsgi to make sure it automatically starts up on system reboot
$ sudo systemctl enable uwsgi -
Start uwsgi service
$ sudo systemctl start uwsgi -
Check uwsgi service status to ensure that everything ran successfully
$ sudo systemctl status uwsgi
Setting Up NGINX
We will use NGINX as a reverse proxy server.
Note: Using uWSGI alone, we can host the website but NGINX comes with a lot of benefits like caching of the dynamic content to reduce server load, improved handling of static resources etc.
NGINX has two directories, sites-available and sites-enabled. sites-available stores all configuration files for all available sites on that particular instance. sites-enabled stores the symbolic link for each enabled site to the sites-available directory.
By default, there is only one conf file named default that has basic setup for NGINX. We can either modify it or delete it and create a new one. In our case, we are going with the latter.
$ sudo rm -rf /etc/nginx/sites-available/default
$ sudo rm -rf /etc/nginx/sites-enabled/default
Now we’ll create the configuration file named nginx-uwsgi.conf which will connect client requests to the uWSGI server.
$ sudo nano /etc/nginx/sites-available/nginx-uwsgi.conf
Paste the code below in the configuration file (replace <ip-address> with the IP adress of your server or your domain name)
upstream dj_dev {
    server unix:/deploy/run/uwsgi.sock;
}

server {
    listen 80;
    server_name <ip-address>;
    charset utf-8;

    client_max_body_size 128M;

    location /static {
        alias /deploy/portal/static_files;
    }

    location /media {
        alias /deploy/portal/media_files;
    }

    location / {
        include uwsgi_params;
        uwsgi_pass dj_dev;
        uwsgi_read_timeout 300s;
        uwsgi_send_timeout 300s;
    }

    access_log /deploy/log/dev-nginx-access.log;
    error_log /deploy/log/dev-nginx-error.log;
}
Create symbolic link into sites-enabled directory and enable nginx as a systemd service
$ sudo ln -s /etc/nginx/sites-available/nginx-uwsgi.conf /etc/nginx/sites-enabled/nginx-uwsgi.conf
$ sudo systemctl daemon-reload
$ sudo systemctl enable nginx
$ sudo service nginx start
Test nginx. It should return OK, Successful as a part of the result
$ sudo nginx -t
If nginx fails, you can check its last error-log or access-log on the path specified in the configuration file: /deploy/log/nginx-error.log and /deploy/log/nginx-access.log
If you want to restart the server or check its status, you can use the commands
# Restart server
$ sudo service nginx restart

# Check server status
$ sudo service nginx status
Now you can access your app via a browser at http://<your-public-ip-address>
P.S. A large portion of this blog post was referenced from this article.